Multilingual Directory
Directories Pro is compatible with WPML and PolyLang. Using one of these plugins, you can have any directory content as well as custom text strings added by yourself such as form field labels displayed in multiple languages.
Note: Directories Pro is currently not compatible with Advanced Translation Editor provided with the WPML Translation Management add-on.
Installation
You will need to install either WPML or PolyLang on your WordPress site.
[WPML] Installation
For detailed instructions on installing the WPML plugin, visit the following page: https://wpml.org/faq/install-wpml/
Other than the core WPML plugin (WPML Multilingual CMS), we also recommend installing the WPML String Translation plugin for translating custom text strings.
[PolyLang] Installation
PolyLang is a free plugin that you can download from WordPress.org. To install the plugin, go to the Plugins page in the WordPress administration dashboard and follow the usual steps for installing a plugin.
Setting up a multilingual directory
The first thing you must do to setup a multilingual directory is to create frontend pages for each language you have enabled in WPML or PolyLang.
Login to your website if not yet logged in and go to the WordPress administration dashboard.
Click Pages -> All Pages from the side menu.
For all the pages currently set up with Directories Pro (see Directories -> Settings -> Pages), create a copy for the language you wish to enable by clicking the plus sign displayed under country flags.

Important: You can not use the same slug for multiple languages. For example, if the directory main page for English is directory, you can not use that slug for any of the directory pages in other languages. Unfortunately that will not work in Directories Pro.
After creating a copy for all pages, click Directories in the admin sidebar, and go to Settings -> Pages.
Using the language switcher at the top of the page, select the language for which you have created pages in step 3.

Under the Page Settings section, assign pages by selecting pages created in step 3 and press Save Changes.
Repeat steps 3-6 for all other languages you wish to enable.
Visit Settings -> Permalinks (this is WordPress settings) which will automatically clear the URL rewrite rules cached by WordPress (no saving is required on this page).
In addition, follow the steps below to enable translation of listings, categories, tags, and locations:
[WPML] Setting up a multilingual directory
Select WPML -> Settings from the side menu.
Scroll down to Post Types Translation and select Translatable for Directory - Listings and press Save. Note that you do not need to select Directory - Reviews or Directory - Claims.
Scroll down to Taxonomies Translation and select Translatable for Directory - Categories, Directory - Tags, and Directory - Locations and press Save.
[PolyLang] Setting up a multilingual directory
Select Languages -> Settings from the side menu.
Click Settings under Custom post types and Taxonomies and check Directory - Listings, Directory - Categories, Directory - Tags, and Directory - Locations and press Save Changes. Note that you do not need to select Directory - Reviews or Directory - Claims.
Now you are ready to start creating multilingual content for your directory! See the following page for details on adding translations for your content items.
- WPML: https://wpml.org/documentation/translating-your-contents/creating-translations-manually/
- PolyLang: https://polylang.pro/doc/translating-pages-posts-categories-and-tags/
Translating custom text strings
Custom text strings such as field labels that you configured in the backend can not be translated with .po/.mo language files since those text strings do not exist as predefined phrases. However, the string translation feature of WPML or PolyLang lets you translate custom text strings from the string translations section in the backend.
- WPML: Select WPML -> String Translation in the side menu.
- PolyLang: Select Languages -> Strings translations in the side menu.
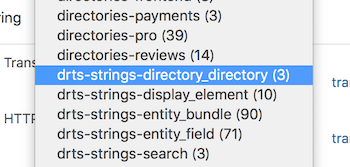
When you click the domain (or group in PolyLang) dropdown list you may already see several ones prefixed with drts-strings-. Thesse domains (or groups) are the ones that contain your custom text strings.

drts-strings-dashboard_panel - Contains text strings for dashboard panel and link labels.
drts-strings-directory_directory - Contains text strings used for directory labels.
drts-strings-display_element - Contains text strings used for displays and filters.
drts-strings-entity_bundle - Contains content type labels such as Listings, All Categories, and %s listings.
drts-strings-entity_field - Contains text strings used for form field labels, descriptions, and options.
drts-strings-location - Contains text strings for location input form field labels.
drts-strings-search - Contains text strings used for search form labels and placeholders.
drts-strings-view - Contains text strings for the filter form.
Simply select a domain (or group) from the dropdown list and start translating the strings to make them multilingual.
Auto register strings for translation
If you do not see any strings registered, go to Directories -> Settings -> System and switch on the Auto register strings for translation setting. This will automatically register strings while pages are rendered in the frontend. This feature may slow down your site significantly so make sure to switch if off once your custom text strings are registered.
Generating translations
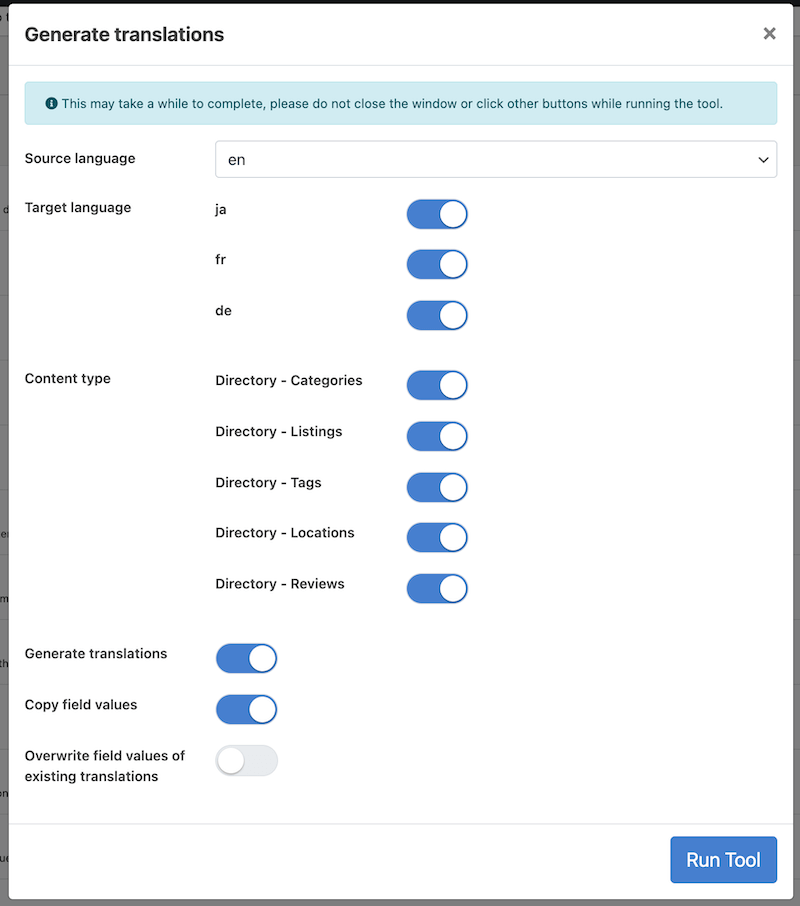
You can use the Generate translations system tool to generate translations for any content items and also copy field values from original content items to translations.
Login to your website if not yet logged in and go to the WordPress administration dashboard.
Click Directories in the admin sidebar.
Click the System tab and then the Tools sub-tab.
Scroll down the screen and then click the Generate translations button.

You can switch on the Overwrite field values of existing translations setting to copy field values of source language content items to translations that already exist in your directory.
Click Run Tool to generate translations.
Common issues
404 page not found error when viewing single listing or term page
Go to Directories -> Settings -> Pages and re-save the settings for all your languages. Then, visit Settings -> Permalinks (this is WordPress settings) which will automatically clear the URL rewrite rules cached by WordPress (no saving is required on this page).
Custom labels are not registered for string translation
Go to Directories -> Settings -> System and switch on the Auto register strings for translation setting. Then, visit the page(s) in the frontend where those custom labels are displayed, which should automatically register those labels for string translation. Make sure to switch the setting off once your custom labels get registered.