Template Files
Customizing displays using the built-in display editor can sometimes be a tedious task for developers or designers. You may prefer writing code and have full control over how content items are rendered and styled in the frontend. This is where template files for displays come into play.
Template file types
There are 2 types of template files for customizing displays in Directories Pro:
- Display template files
- Element template files
Display template files
Display template files let you have full control over how displays are rendered. When you create a display template file for a given display (Detailed, Summary, etc.) of a certain content type, the output of each content item for the display will be generated solely from the template file. Any configurations or modifications added through the display editor are ignored. Therefore display template files are for advanced developers and not recommended unless you know what you are trying to do. If you are simply trying to customize certain parts of a display, consider using element template files instead.
Display template files must be saved with its file name formatted as:
xxxx-display_yyyy.html.php
where xxxx is the machine readable name of a content type (e.g. directory__listing) and yyyy is that of a display (e.g. detailed).
To check the machine readable name of a content type, go to Directories -> All Directories, and then to the Content Types page (or tab) of your directory. The text strings shown in parentheses under the Content Type column in the table are the machine readable name of each content type. As for the machine readable name of a display, simply convert the name of the display to lower case and then change spaces to underscores.
For example, below are the names of display template files for listings:
- Detailed -
directory__listing-display_detailed.html.php - Summary -
directory__listing-display_summary.html.php - Dashboard Row -
directory__listing-display_dashboard_row.html.php
Once you create a display template file for a display and place it under a valid file location, you will see a warning message similar to below appear at the top of the display editor:

This confirms that your display template file is enabled and used to render the display, and whatever you configure on the display editor is ignored as long as the template file exists.
Element template files
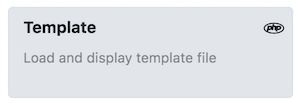
Element template files are useful when you need to customize only a certain part of a display. Element template files are rendered by the Template element or the Field Template element within a display. Simply add these elements through the display editor and place them anywhere within the display just like you do with other elements.
The Template and Field Template elements both have a setting labeled Template file which lets you select a template file to be loaded and rendered by the element:

There is no template file selectable by default so you will need to create one in order to use the element.
Element template files must be saved with its file name formatted as:
xxxx-element_yyyy.html.php
where xxxx is the machine readable name of a content type (e.g. directory__listing) and yyyy can be any number of alphanumeric lowercase characters (a-z,0-9) or underscores.
For example, if there is a template file named directory__listing-element_test_template.html.php, then you will see an option added to the Template file setting as below:

As you can see, the yyyy part of the template file name, test_template in this case, is used as the label of the template file in the setting (shown as Test Template).
Template vs Field Template elements
The difference between the Template and the Field Template elements is that the Field Template element is handled as a Field type element. This lets you add Field Template elements to a Field List element, which allows only Field type elements to be contained, so that you can display your template content along with other Field type elements.
Another difference is that Template elements are handled as block-level HTML elements whereas Field Template elements as inline HTML elements.
Template file location
Template files can be placed under the following directory:
wp-content/themes/[Your_Current_Theme]/drts
where [Your_Current_Theme] is the name of the theme that is currently active on your site. You will need to manually create the drts folder if it does not exist under your theme directory and then run the Clear cache tool from Directories -> System -> Tools.
Note: If you are currently not using a child theme, it is strongly recommended that you create a child theme of the current theme first and then create the drts folder under that child theme. Otherwise, the drts folder and your template files in the folder will be removed when you update the current theme. For more details on child themes, see the following page: https://codex.wordpress.org/Child_Themes
Alternatively, you can place your template files under the following directory:
wp-content/drts/assets
You will need to manually create the directory if it does not exist and then run the Clear cache tool from Directories -> System -> Tools. You can place your template files under this directory if you wish them to be used not only by the current theme but by other themes as well.
Template files are searched in the following order:
If the current theme is a child theme:
drtsfolder of the current themewp-content/drts/assetsdrtsfolder of the parent theme
If your theme is not a child theme:
wp-content/drts/assetsdrtsfolder of the current theme
Creating a template file
Now let's create a template file and try adding some code to it. We will create an element template file for listings which generates a list of RSS feed items of the currently viewed listing if the listing has an RSS feed URL entered for the Social Accounts field. We will then display the template using the Template element.
Create an empty file named
directory__listing-element_rss_feed.html.phpand place it underwp-content/drts/assets.Copy and paste the following code to the file created in step 1:
<?php
$social_accounts = get_post_meta($entity->post()->ID, '_drts_field_social_accounts', true);
if (!$social_accounts || !isset($social_accounts['rss'])) return;

$rss = fetch_feed($social_accounts['rss']);
if (is_wp_error($rss)) {
    echo '<p>' . $rss->get_error_message() . '</p>';
    return;
}

$items = $rss->get_items(0, 5);
if (empty($items)) return;
?>
<ul>
<?php foreach ($items as $item):?>
    <li><a href="<?php echo esc_url($item->get_permalink());?>" title="<?php echo esc_attr(sprintf('Posted %s', $item->get_date('j F Y | g:i a')));?>"><?php echo esc_html($item->get_title());?></a></li>
<?php endforeach;?>
</ul>
If you know PHP then you may have noticed in the code above that there is an
$entityPHP variable that is coming from nowhere. It is a PHP object (instance of \SabaiApps\Directories\Component\Entity\Type\IEntity) representing the currently viewed content item (listing, category, tag, etc.), which is passed to the template by the system when the template is loaded.If the current content item is a post, then you can get a WordPress post object using the
post()method of the$entityobject:$post = $entity->post();Similarly, if the current content item is a taxonomy term, you can get a WordPress taxonomy term object using the
term()method of the$entityobject:$term = $entity->term();Both methods will return
NULLif a post or term was not found or in case of an error.In case you need to check if the current content item is a post or a term object, you can use the
isTaxonomyTerm()method:if ($entity->isTaxonomyTerm()) { $term = $entity->term(); } else { $post = $entity->post(); }Now, let's get back to the code and take a look at the following part:
$social_accounts = get_post_meta($entity->post()->ID, '_drts_field_social_accounts', true);Since we're creating a template file for listings, the
post()method is used to fetch a WordPress post object. Then the WordPressget_post_metafunction is used to get a value of the Social Accounts field entered for the listing. The meta key for fields in Directories Pro plugins takes the following format:_drts_xxxxwhere
xxxxis the machine readable name of a field.Note: To check the machine readable name of a field, go to the Content Types page (or tab) of your directory, click the dropdown button in the row of the content type to check and click Manage Fields. On the form editor page, hover over to the field element you are looking for and then to the bluish-green info button. A popup will be displayed showing all the meta information of the element as below:
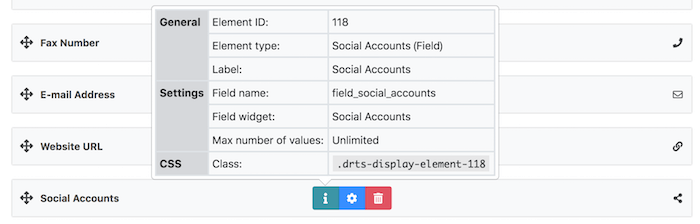
The value of the field name column in the popup is the machine readable name of the field.
Getting back to the code, the following line makes sure that a value for the Social Accounts field exists and that an RSS feed URL has been entered:
if (!$social_accounts || !isset($social_accounts['rss'])) return;As you can see above, you can use
returnto abort the rendering of the template file and return an empty content to the current display.The remaining part of the code simply uses the
fetch_feed()function available in WordPress to fetch an RSS feed from a URL and then renders it as an unordered list. For more details on thefetch_feed()function, see the WordPress CodexSave the template file.
Now the template file has been created, let's add a template element to the Detailed display of listings.
Go to the Manage Displays page for listings and on the Detailed display editor, click the green Add Element with a plus sign at the bottom of the page.
In the popup window, select the Content tab and click Template.
Under the General Settings tab, select Rss Feed for the Template file setting.

Under the Heading Settings tab, configure as follows:
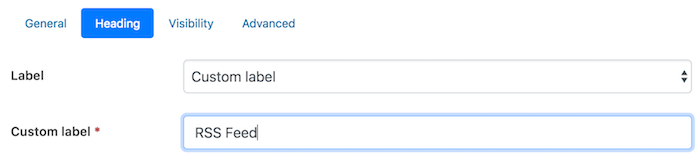
Label - Custom label
Custom label - RSS Feed
Leave other settings as-is and click the Add Element button at the bottom of the popup window.
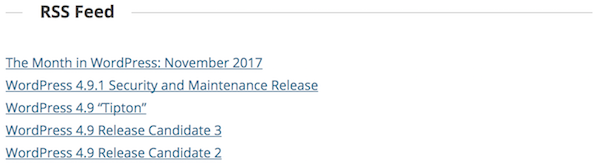
Now, visit the single listing page of a listing in the frontend. If the listing has a valid RSS feed URL entered for the Social Accounts field, then the RSS Feed section should look something like below:
Adding styles to your template file
Although we were able to display an RSS feed for listings, it may not look pretty because of the stylings added by your current theme. In order to resolve that issue, you can create a CSS file for your template file containing custom CSS rules that will be applied to the content rendered by your template file.
The name of the CSS file will be the same as that of the template file but with a .css file extension. For example the CSS file for the RSS feed template file will be:
directory__listing-element_rss_feed.css
Simply place the CSS file under the same directory where your template file resides. The system will then automatically load the CSS file when rendering the template file.
In the CSS file, you can use the following CSS class which is assigned to the parent <div> element of the HTML content rendered by the template file.
drts-display-element-template-name-yyyy
where yyyy is the same yyyy part used to name the template file. For example the CSS class name of our RSS feed element template file will be:
drts-display-element-template-name-rss_feed
Note: There is no CSS class name for display template files.
Let's try adding some custom CSS styles to RSS feed items rendered by the template.
Note: Some themes may render RSS feed items perfectly fine without adding any custom CSS rules, and the following is for illustration purposes only.
Create an empty file named
directory__listing-element_rss_feed.cssand place it underwp-content/drts/assets.Copy and paste the following CSS rules to the file created in step 1:
.drts .drts-display-element-template-name-rss_feed ul {
  list-style-type: none;
}
.drts .drts-display-element-template-name-rss_feed li {
  padding: 0.5em 0;
  margin: 0;
  border: 0;
  border-bottom: 1px dashed #ccc;
}
.drts .drts-display-element-template-name-rss_feed li:last-child {
  border-bottom: 0;
}
.drts .drts-display-element-template-name-rss_feed li:before {
  content: '\f15c';
  font-family: 'Font Awesome 5 Solid - drts';
  float: left;
  margin-right: 0.5em;
}
Note: The
.drtsCSS class selector was added to ensure the custom styles override the CSS rules defined by the current theme.Save the CSS file.
Reload the single listing page in the frontend. The RSS feed section should now look similar to below:

Additional methods and helpers
$entity object methods
Below are some of the additional methods that can be called through the $entity object.
string getTitle()Returns the title of the content item.
object getAuthor()Returns a user identity object representing the author of the content item.
int getAuthorId()Returns the user ID of the content item author.
string getBundleType()Returns the content type name of the content item.
string getSlug()Returns the slug of the content item.
int getTimestamp()Returns the timestamp value of the date the content item was created.
int getId()Returns the ID of the content item.
array getFieldValues()Returns all the field values of the content item.
array getFieldValue(string $fieldname)Returns values of a specific field. This is equivalent with
get_post_meta($entity->getId(), $fieldName)(orget_term_meta($entity->getId(), $fieldName)for terms) and$entity->$fieldName.mixed getSingleFieldValue(string $fieldName)Returns a single value of a specific field. This is equivalent with
get_post_meta($entity->getId(), $fieldName, true)(orget_term_meta($entity->getId(), $fieldName, true)for terms) and$entity->$fieldName[0].string getContent()Returns the full content value of the content item.
Helper methods
Here are some helper methods that may be useful to use in your template file. These methods are called through the $this variable which is a template object available by default within template files.
$this->Entity_PermalinkUrl(object $entity, string $fragment = '', string $lang = null)Returns the permalink URL of the content item (
$entity) passed to the method.$fragment- # part in the URL to append to the URL.$lang- Pass in language code to get the URL of the content item for a specific language in a multilingual directory.
$this->Entity_Image(object $entity, string $size = 'medium')Returns the URL of an image file associated with the content item (
$entity) passed to the method. The URL of the first image file will be returned if the content item has multiple images.$size- One of thumbnail, medium, large, full.$fieldName- Machine readable name of an Image type field. Use this parameter to get the URL of an image from a custom field.
$this->System_Text_summarize(string $text, int $length = 0, string $trimmarker = '...')Returns a summarized version (without HTML or line breaks) of the text content passed to the method.
$text- Original text value.$length- Length of summarized text in characters.$trimmarker- String added to the end of the summarized text.
Example:
<?php if ($content = $entity->getContent):?>
<p><?php echo $this->System_Text_summarize($content, 100);?></p>
<?php endif;?>
$this->UserIedntityHtml(object $identity, string $format, bool $thumbnailOnly = false)Returns an HTML fragment representing the user identity passed to the method.
$identity- User identity object.$format- One of link, link_thumb_s, link_thumb, thumb_s, thumb.link - User name with a link.
link_thumb_s - User name and small icon with a link.
link_thumb - User name and thumbnail with a link.
thumb_s - Small icon image.
thumb - Thumbnail image.
$thumbnailOnly- Whether or not to return thumbnail image only. This parameter is valid only when$formatis link_thumb_s or link_thumb.Example:
<?php if ($identity = $entity->getAuthor()):?>
<?php   echo $this->UserIdentityHtml($identity, 'link_thumb_s');?>
<?php endif;?>