User Login/Registration and Guest Posts
User Login/Registration Settings
Guest users are redirected to the default WordPress login page when they try to submit listings from the frontend (unless guest posting is enabled, see Guest Post Settings). However, the design and layout of the default WordPress login page does not match your current theme which may be confusing to some visitors.
This is when you can enable the custom login/registration form feature. When enabled, login and registration forms are displayed on a standard WordPress page using the layout of your WordPress theme.
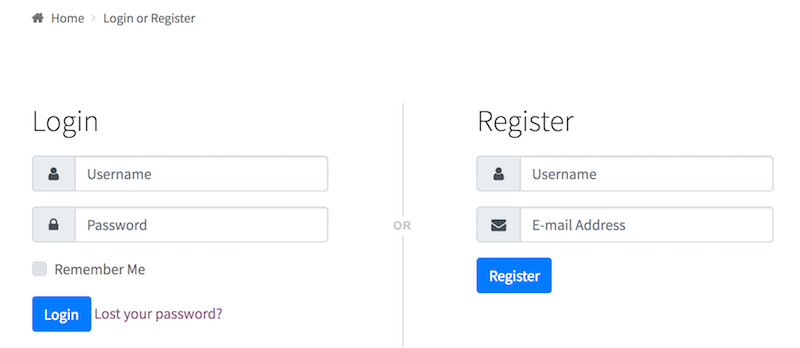
Below is an example of how the login/registration page looks like when the feature is enabled:
Follow the steps below to enable and configure custom user login/registration forms:
Login to your website if not yet logged in and go to the WordPress administration dashboard.
Click Directories in the admin sidebar.
Click the Settings tab and then the Frontend Submit sub-tab and scroll down to the section labelled User Login Settings:
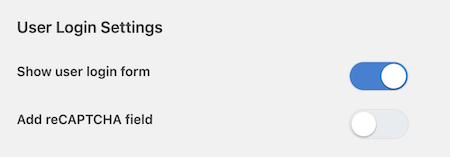
Show user login form - Whether to show a custom login form to guest users.
Show lost password link - Whether to show a link to lost password page in the login form.
Customize lost password e-mail - Switch this setting on if you wish to customize the subject and body of the lost password email sent to users.
Enable social login - Whether to enable logging in using social media accounts.
Social login providers - Choose and re-order social login providers that you wish to enable. For more details, see Social login below.
Scroll down to the section labelled User Registration Settings:
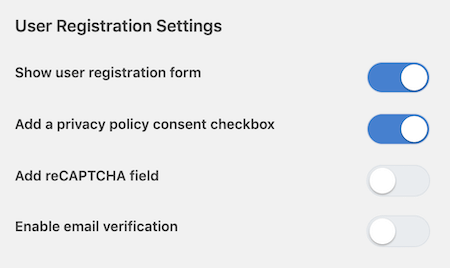
Show user registration form - Whether to show a custom registration form to guest users.
Note: Make sure user registration is enabled in WordPress (Settings -> General -> Membership), otherwise the registration form will not display even when Yes is selected for this option.
Show user registration form on separate page - Whether to show the custom registration on a separate page. The URL of the page will be https://url_to_login_page/register.
Show user registration link - Whether to show a link to the user registration page if not showing registration form on the login page.
Add a privacy policy consent checkbox - Whether to show a checkbox for privacy policy consent required to check in order to submit the registration form.
Enable e-mail verification - Whether to require newly registered users to verify their account by sending a verification email. For more details, see Email verification below.
Scroll down the page and press Save Changes.
In addition, make sure that a valid WordPress page is assigned as the page for displaying the login and registration forms.
Click the Pages sub-tab and scroll down to Page Settings.
Make sure a valid page is selected for Login/Registration.

Scroll down the page and press Save Changes.
Social login
The social login feature lets users login and register on your site automatically by simply logging into a social login provider website. Social login providers currently available are:
- GitHub
All social login providers above require a client ID and a client secret. Follow the instructions on each site to obtain them and enter them into the settings under the User Login/Registration Settings.
When enabled, a login button for each social login provider will appear under the login form in the frontend:

Email verification
The email verification feature lets you moderate newly registered user accounts by sending a verification email to the email address used during user registration. Users that received a verification email are then required to click on the user verification link in the email to verify their account before they can login.
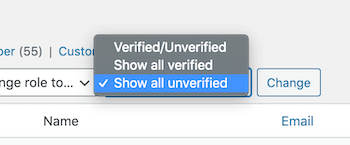
Administrators can view verified/unverified user accounts on the Users page in the backend, as well as manually verify/un-verify accounts and/or resend a verification email.
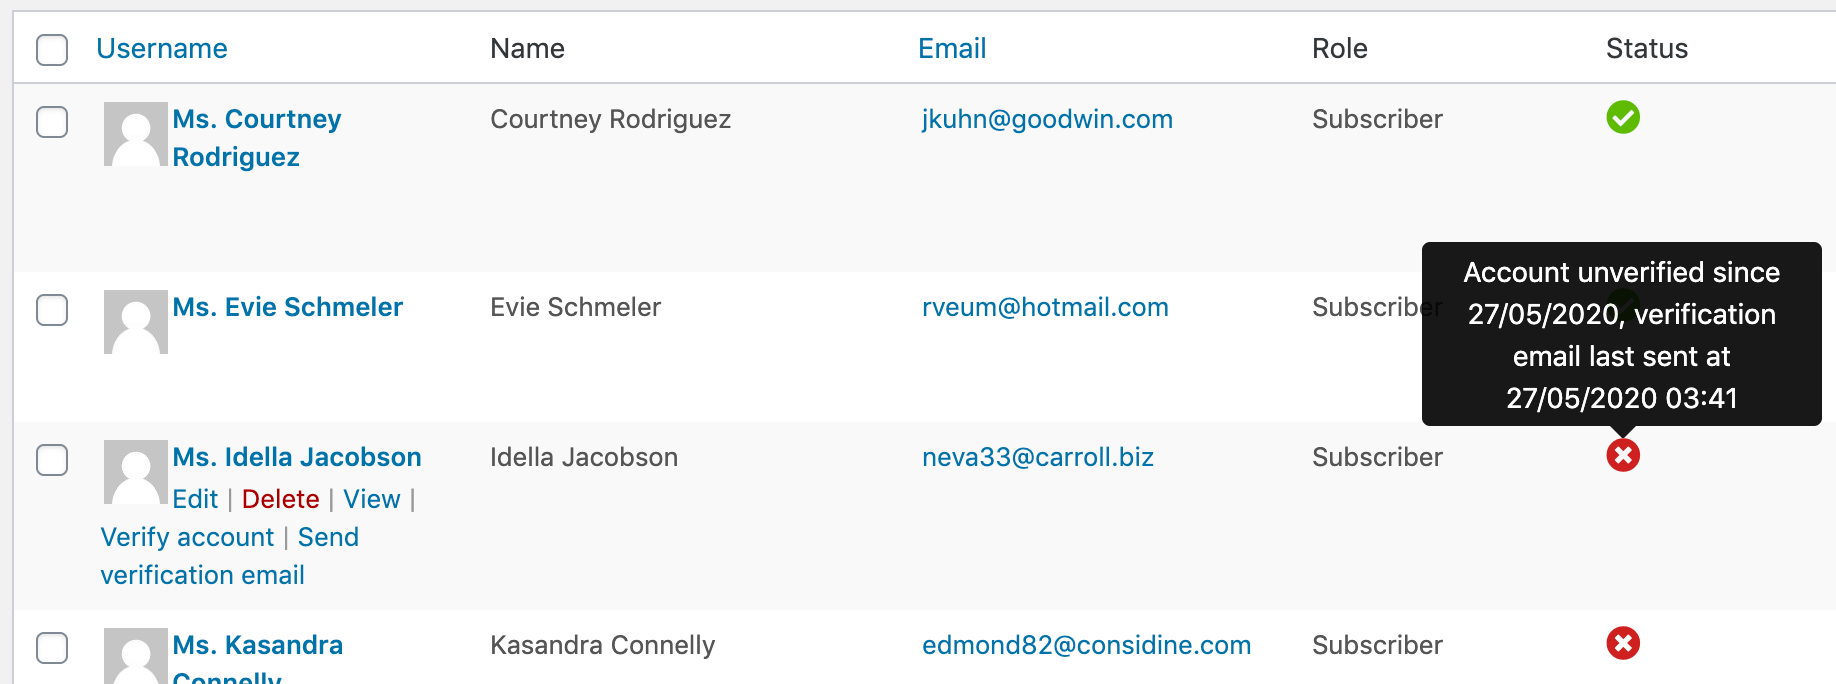
You can also use the filter above the list of users to show verified or unverified users only.
In order to enable the email verification feature, switch on the Enable verification setting under the User Registration Settings section (Directories -> Settings -> FrontendSubmit -> User Registration Settings). You will then see the following additional settings appear.
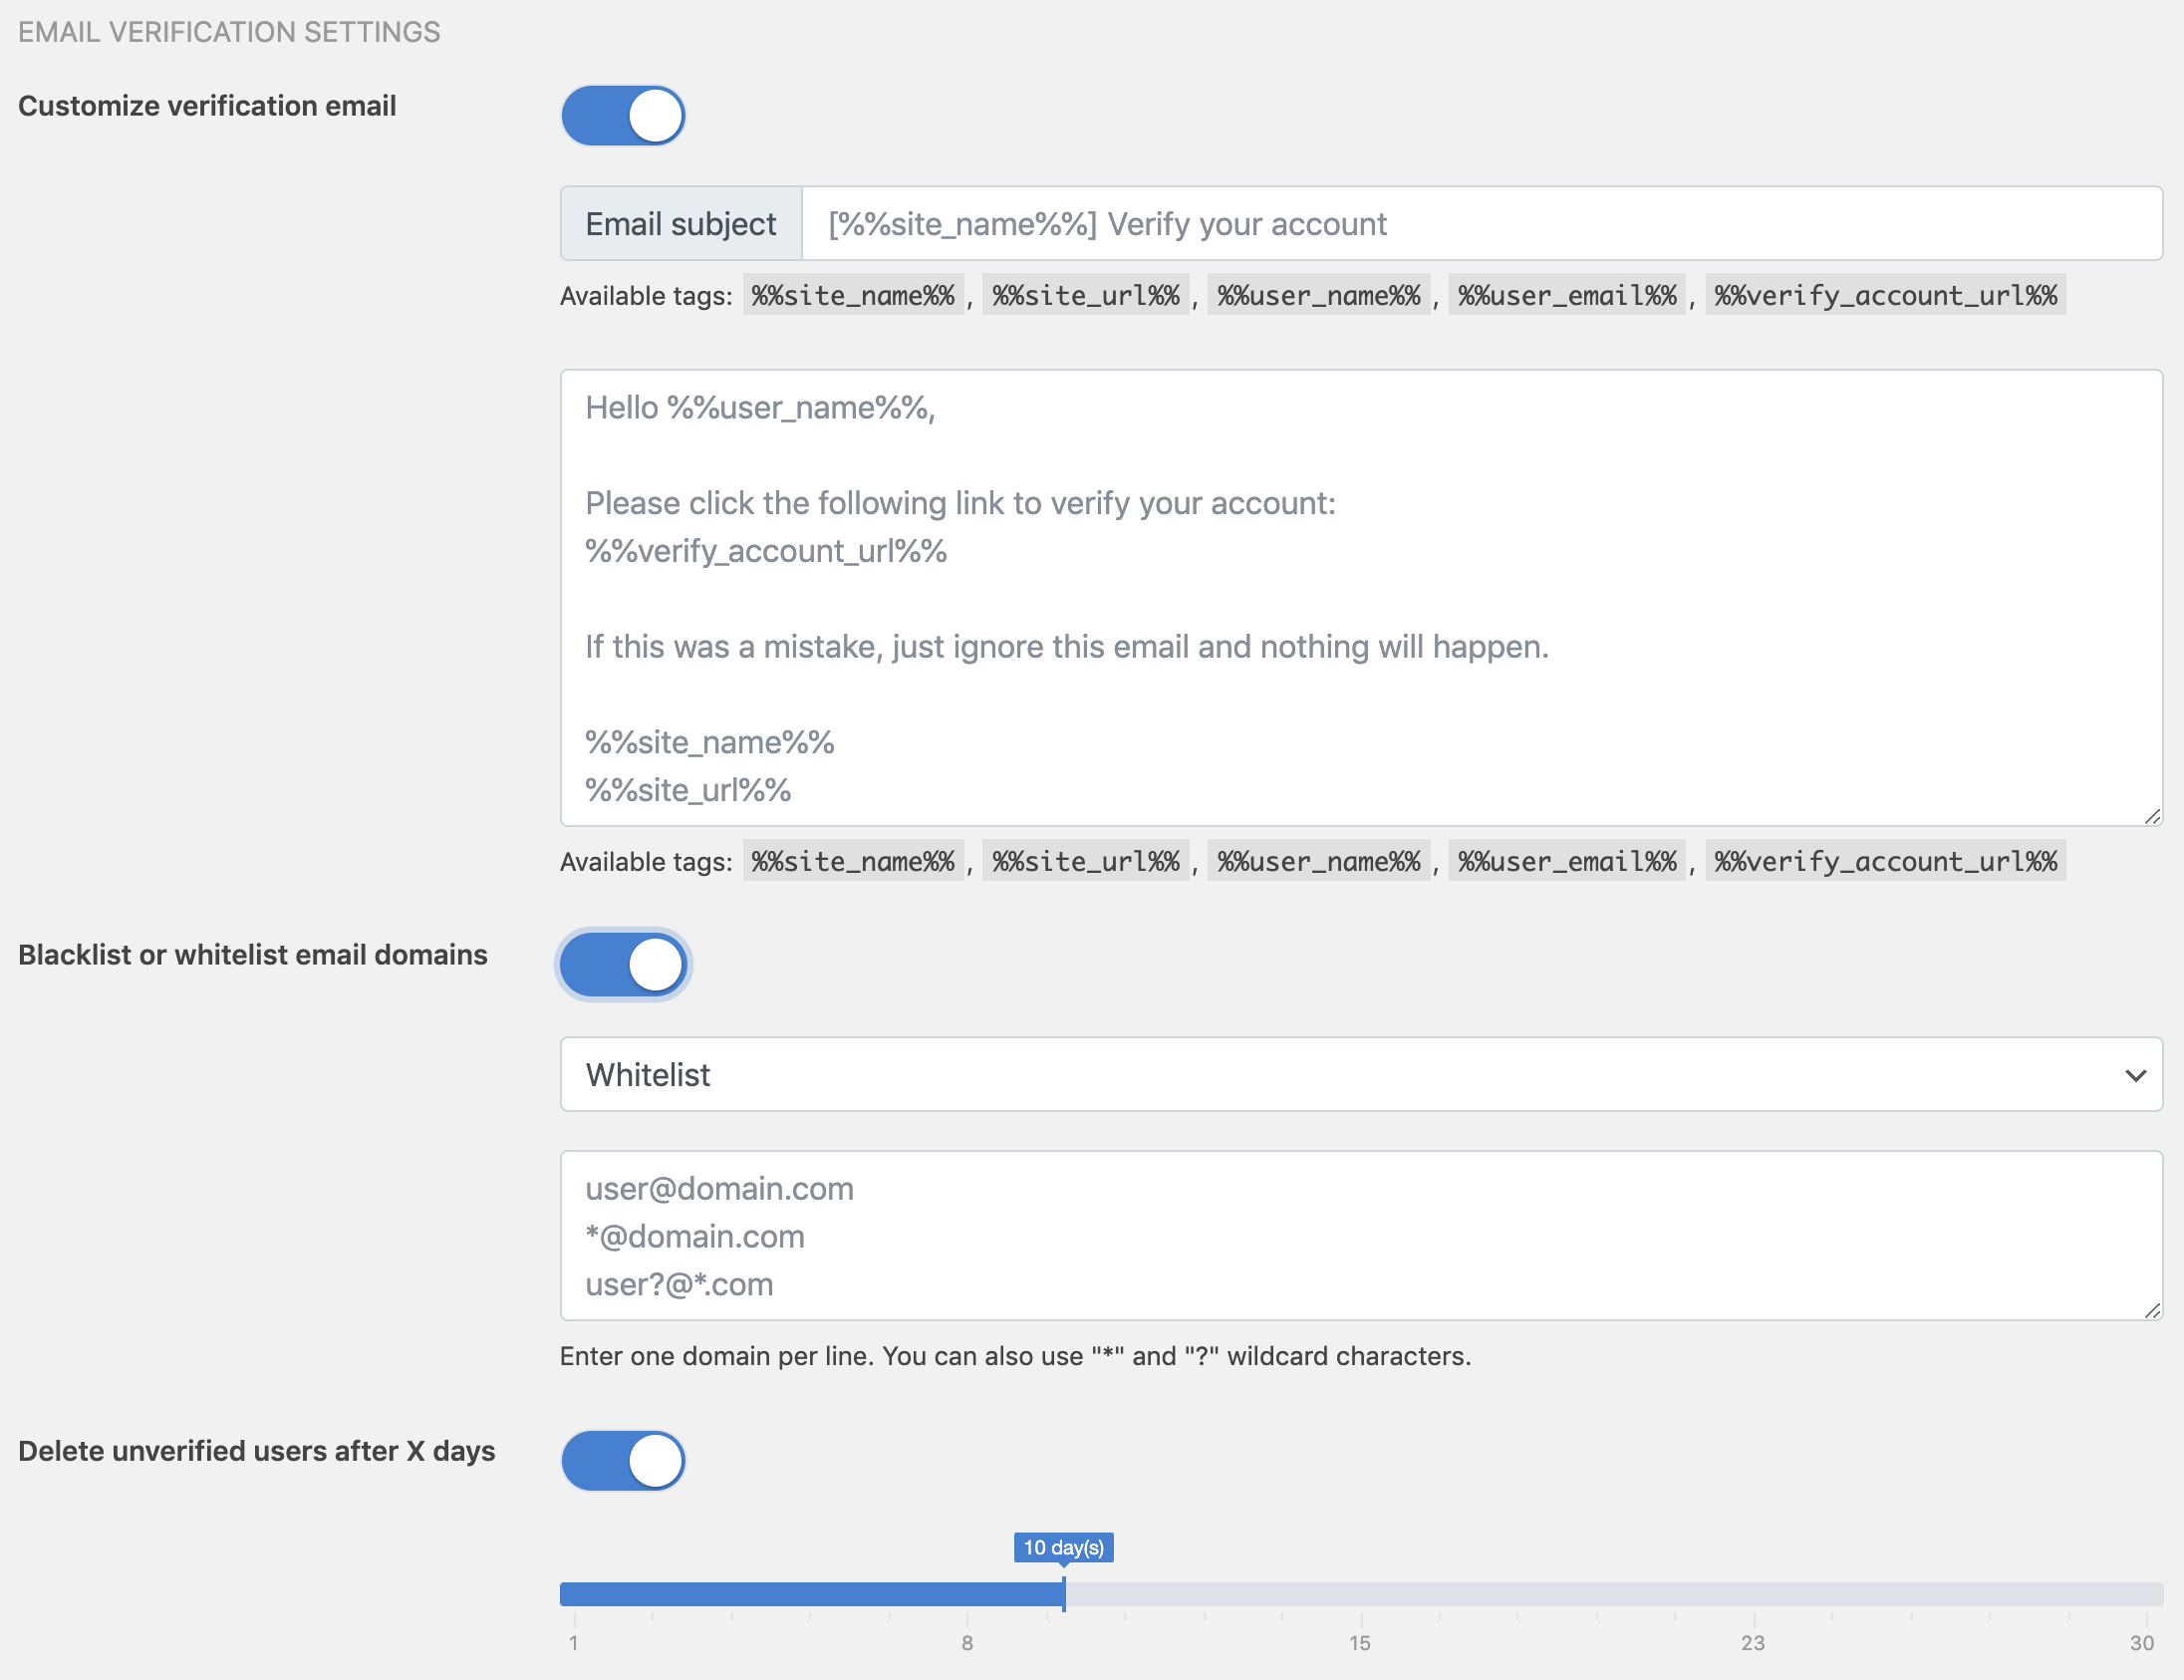
Customize verification email - Switch this setting on if you wish to customize the subject and body of the verification email sent to users.
Blacklist or whitelist email domains - Whether to blacklist/whitelist email addresses used during user registration. If Blacklist is selected, only the email addresses that matched one of the entries in the list will require email verification. If Whitelist is selected, email addresses that matched one of the entries in the list will NOT require email verification.
Delete unverified users after X days - Whether to delete accounts that are still unverified X days after user registration. Switch this setting on and select the number of days user accounts can remain unverified (default: 30 days).
Two-Factor Authentication (2FA) with WP-2FA
Directories Pro is compatible with the WP-2FA plugin, which allows administrators and users to enable two-factor authentication for their accounts. Once enabled, users will be required to verify a login attempt with a second factor (such as a one-time code from an authenticator app) after entering their username and password.
This enhances login security for both regular users and administrators without changing the existing login/registration forms.
Disable custom login/registration form feature
In case you need to disable the custom login/registration form feature of Directories Pro, simply unselect the currently selected option for the Login/Registration setting under Page Settings (Directories -> Settings -> Pages).
Or, if you are currently not logged in and for some reason unable to log in through the custom login form, you can add the following line of code to the functions.php file of your theme to force disable the custom login feature:
add_filter('drts_frontendsubmit_login_disable', '__return_true');
`
Guest Post Settings
In Directories Pro, you can let visitors submit posts on your site without login or registration by granting relevant permissions to the Guest user role (see Permissions for details).
Guest users are by default required to enter their name and e-mail address when posting. There are additional options such as requiring them to enter a website URL and un-requiring the e-mail address field. In order to configure what data should or should not be collected from guest users, follow these steps:
Login to your website if not yet logged in and go to the WordPress administration dashboard.
Click Directories in the admin sidebar.
Click the Settings tab and then the Frontend Submit sub-tab and scroll down to the section labelled Guest Post Settings:
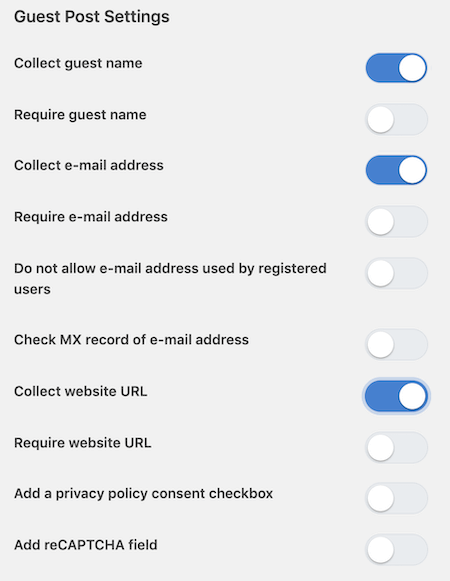
Collect guest name - Whether to show an e-mail address field.
Require guest name - Whether to require an e-mail address to be entered.
Collect e-mail address - Whether to show an e-mail address field.
Require e-mail address - Whether to require an e-mail address to be entered.
Do not allow e-mail address used by registered users - Whether to prevent from entering an e-mail address that is associated with an existing user account.
Check MX record of e-mail address - Whether to make sure a valid MX record is found for the domain of the e-mail address entered, to prevent fake e-mail addresses.
Collect website URL - Whether to show a website URL field.
Require website URL - Whether to require a website URL to be entered.
Add a privacy policy consent checkbox - Whether to show a checkbox for privacy policy consent required to check in order to proceed.
Scroll down the page and press Save Changes.
In the frontend, a form similar to below will be shown to guest users when they try to submit a listing:
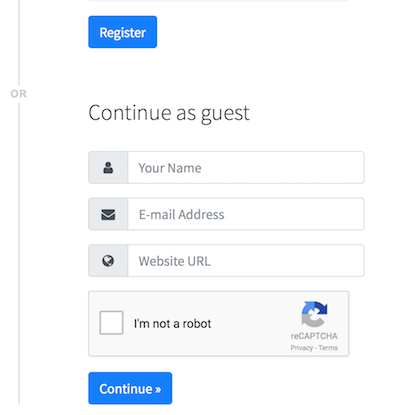
The guest user can then fill out the fields and click the Continue button to proceed to the add listing page.
Note: If you have disabled the custom login/registration form feature of Directories Pro, then it is not possible to collect any guest information and therefore all the guest post settings are ignored. In that case, guest posts will be created with the guest name set to "Guest" and all other information empty.
Guest dashboard
Guest users who have submitted posts on your site can manage their posts through the guest dashboard. Guest users must first request temporary access by entering their e-mail address into the request guest access form. Then, a notification e-amil containing a URL for temporary access to the directory dashboard is sent to the e-mail address, if there are any posts associated with the e-mail address.
To enable the guest dashboard feature, follow these steps:
Login to your website if not yet logged in and go to the WordPress administration dashboard.
Click Directories in the admin sidebar.
Click the Settings tab and then the Dashboard sub-tab and scroll down to the section labelled Guest Access Settings:

Enable guest access - Whether to enable the guest dashboard feature.
Duration in days - Enter the number of days guest access is allowed.
Customize guest access URL notification e-mail - Switch this setting on if you wish to customize the subject and body of the guest access URL notification email sent to users.
When the feature is enabled, the request guest access form will be displayed on the login/registration page when a guest user tries to access the directory dashboard, as shown below:

Note: If you have disabled the custom login/registration form feature, you can manually create a link to the page that shows the request guest access form, using the following URL: https://[url_to_your_directory_dashboard_page]/request_guest_access, for example, https://demo.directoriespro.com/dashboard/request_guest_access.
Also, make sure to switch on the Collect e-mail address setting in Guest Post Settings so that an e-mail address, which is required when requesting guest access, is associated with posts submitted by guest users.