Replicating the Demo Site Directory
This guide explains step-by-step how to create a directory on your site that looks exactly like our demo site (https://demo2.directoriespro.com/).
Install Directories Pro
Follow the Installation instructions to install Directories Pro. Next, configure the map libraries and complete the Map provider, Geocoding API, and Time zone API settings. The Address autocomplete service is not required. For the demo site, we used OpenStreetMap, Google Maps Geocoding, and Google Maps Time Zone.
Install the Blocksy Theme and a Child Theme
Our demo site uses the free version of the Blocksy theme by Creative Themes. To install it, follow their official installation instructions.
We also strongly recommend setting up a Blocksy child theme by following these instructions.
Install Required Plugins
To fully replicate the demo site, please install and activate the following free plugins from the official WordPress repository before proceeding:
Widget Options - Used to display legacy widgets on various pages.
WPForms Lite - Used to show a contact form on the single listing page.
Responsive Lightbox & Gallery - Used to display a beautifully responsive image gallery when the
[gallery]shortcode is used.
Create the Places Directory
Next, we will create the Places directory by importing a pre-configured file from the demo site.
First, right-click the places.json link and save the file to your computer. Then, follow these steps:
In your WordPress dashboard, go to Directories and click Add Directory.
In the popup window, select Import from a file under the Choose a method option.
Click the Choose file button, select the
places.jsonfile you just downloaded, and upload it.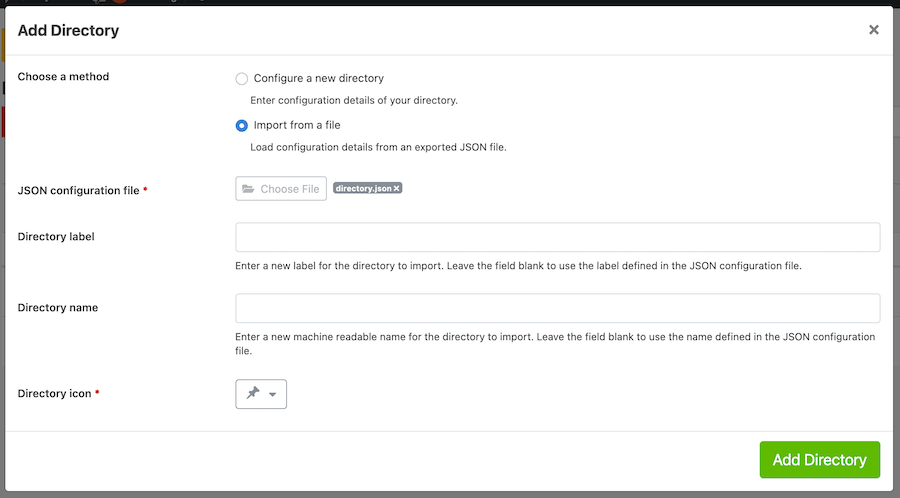
Click the Add Directory button at the bottom of the popup window.
Now, let's configure the widgets that will appear on the directory's main page and single listing pages.
Go to Appearance > Widgets in your WordPress dashboard.
In the Main Sidebar section, remove all currently active widgets so it is completely empty.
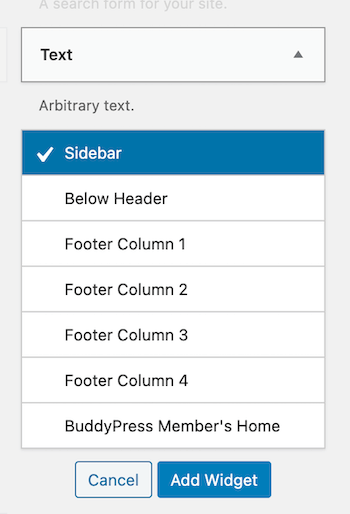
Under Available Widgets, click the standard Text widget, ensure Main Sidebar is selected, and click Add Widget.
In the widget settings, leave the Title field empty. Switch to the Code tab in the editor and enter the shortcode
[drts-directory-search directory="places"]. Next, under the eye icon tab (provided by the Widget Options plugin), select Show on checked pages, search for the Places page, click it, and then Save.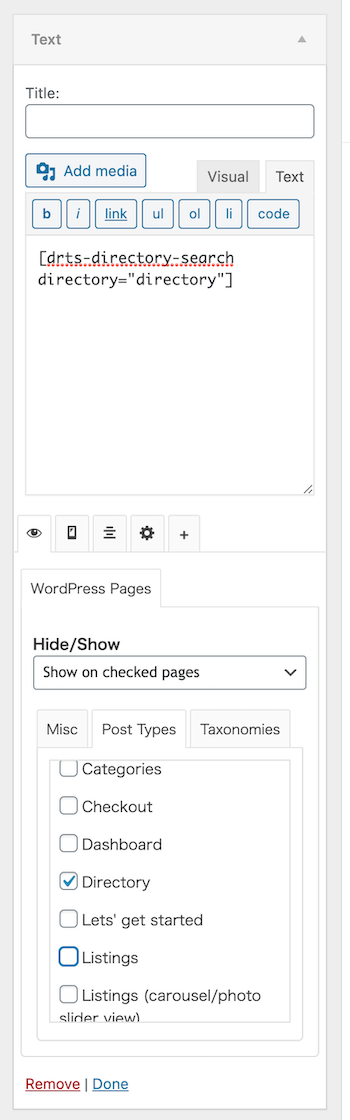
Under Available Widgets, click the Directories: Filter Form widget, ensure Main Sidebar is selected, and click Add Widget. In the settings, check the Hide on mobile box and click Save.
Under Available Widgets, click the Directories: Display Element widget, ensure Main Sidebar is selected, and click Add Widget. Enter Place Details for the Title, select Places - Place - Listing Details from the Select display element dropdown, and click Save.
Add another Directories: Display Element widget to the Main Sidebar. Enter Hours for the Title, select Places - Place - Opening Hours for the display element, and click Save.
Add another Directories: Display Element widget to the Main Sidebar. Enter Contact Us for the Title, select Places - Place - Contact Form for the display element, and click Save.
Add one last Directories: Display Element widget to the Main Sidebar. Enter Listing Information for the Title, select Places - Place - Listing Information for the display element, and click Save.
Create a landing page
Now let's create a landing page for your directory.
In the WordPress administration dashboard, go to Pages and click Add New.
Click the blue button with a plus sign (+) located at the top left corner of the editor.
Click the Patterns tab, select the Directories category on the left, and then click the pattern thumbnail to add it to the page.
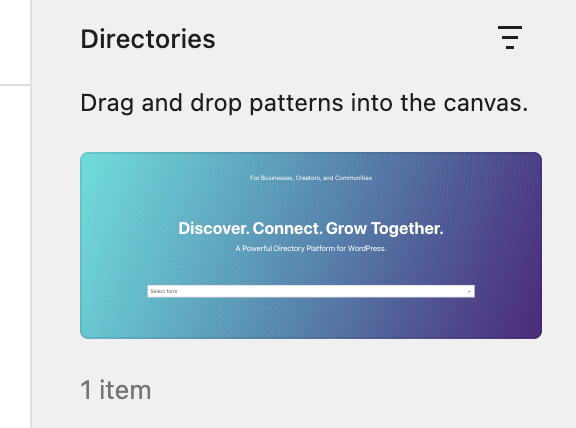
Within the inserted pattern, select Places from the Select form dropdown.
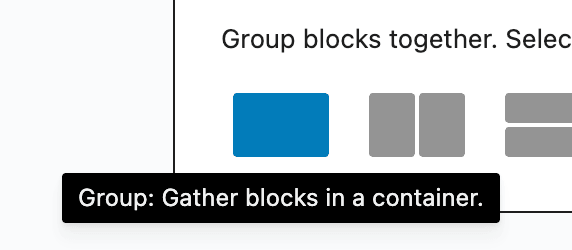
Next, add a Group block with a single column.
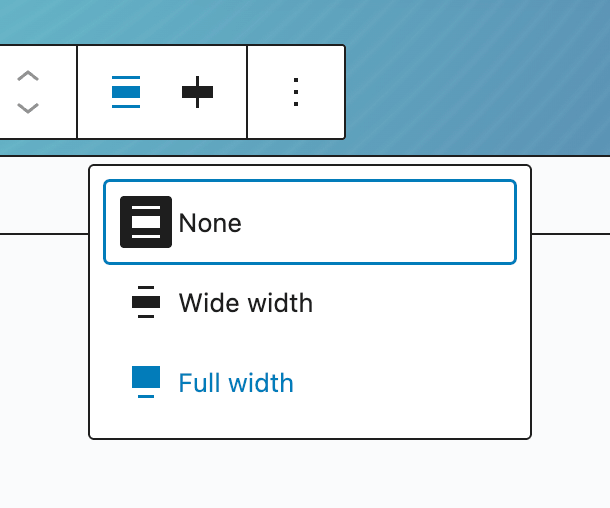
Click the Align button in the block toolbar and select Full width.
Inside the group block, add a new Directories: View block and select Places - Places - Featured Listings from the Select a view dropdown. Leave the title empty (or remove the Heading inner block).
Under the group block, add a new Directories: View block and select Places - Categories - Top Categories from the Select a view dropdown. Enter Top Categories for the title.
Add a new Directories: View block and select Places - Locations - Popular Locations from the Select a view dropdown. Enter Popular Locations for the title.
Add a new Directories: View block and select Places - Places - Recent Listings from the Select a view dropdown. Enter New Places for the title.
Add a new Directories: View block and select Places - Reviews - Recent Reviews from the Select a view dropdown. Enter Recent Reviews for the title.
To hide the page title, click the Options button (three vertical dots) at the top right and select Blocksy Page Settings. Click Page Title and select Disabled. Go back, click Custom under Content Area Vertical Spacing and choose Disabled.
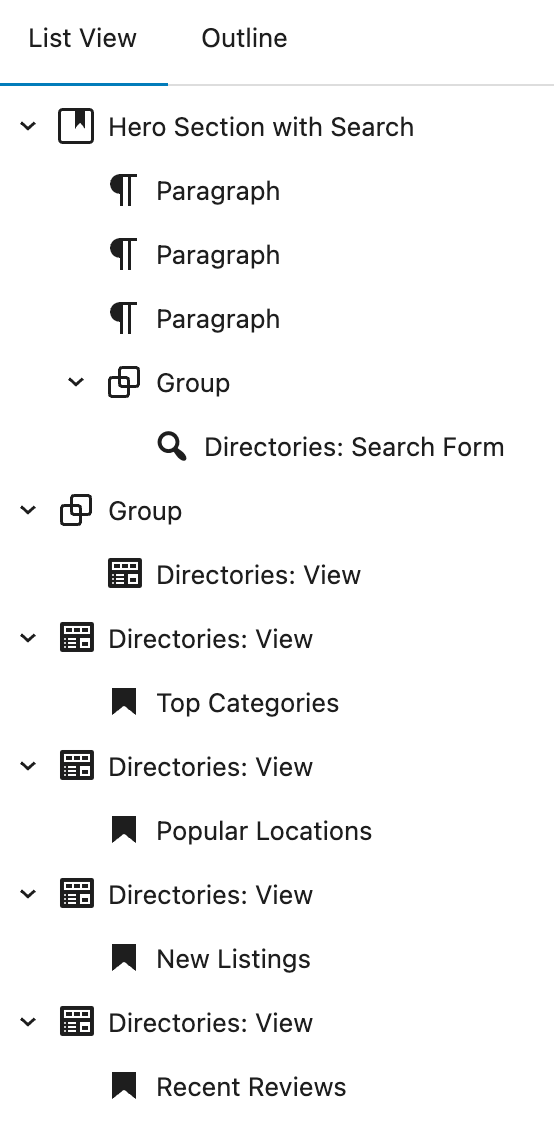
Click Publish (or Save if the page is already published) at the top right. The List view of the page in the sidebar should look like the image below.
Optionally, you can set this page as your site's homepage by going to Settings -> Reading -> Your homepage displays in the WordPress dashboard.
Add content to your directory
Now that your directory is set up and ready, you can start adding content to your directory. You can also:
Create payment plans - Monetize your directory by creating payment plans and charging users for posting their listings to your directory. For details on creating payment plans, see Setting Up Payment and Payment Plans.
Setup demo content - If you wish to set up demo content instead of creating them manually, you can import demo categories, locations, and tags, and then generate dummy listings and finally reviews. For detailed instructions, see Dummy Content.
Import content from CSV - You can import any content from CSV files. See Exporting and Importing Content for detailed instructions.
Other settings and features
Below is a list of other settings and features enabled on our demo site that you may be interested.
- Create pages to display bookmarked listings and reviews. See this FAQ for detailed instructions.
- Install the Grow Social plugin to enable social share buttons on single listing pages.
- Install the Post Views Counter plugin to count and display the number of page views for each listing. See this FAQ for details.
- Install the Autoptimize plugin to optimize and aggregate CSS and JavaScript files.