Displaying Content with Views
What are views? A view is simply a set of criteria and configurations to query, sort, and display content items in various ways. For example, you can use views to display listings in a standard list format, a photo slider, on a map with map markers, or display photos of locations in a masonry layout. Views are enabled for listings, categories, tags, locations, and reviews in Directories Pro.
Configuring the default view for listings
Listings shown on the directory main page and single taxonomy pages of your directory in the frontend are displayed by a single view setup for listings by default (hereafter "default view"). You can customize how and what listings are displayed on those pages by modifying the settings of the default view.
Follow the steps below to configure the default view.
Login to your website if not yet logged in and go to the WordPress administration dashboard.
Click Directories in the admin sidebar.
Under the All Directories tab, click the gear icon in the row of the directory to edit.
Under the Content Types tab, click the dropdown button in the Listing row and then click Manage Views.
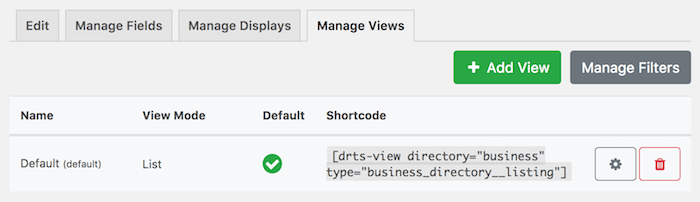
As can be seen above, there is already a view created for listings. Also notice the green check icon shown for the view in the Default column which indicates that the view is a default view.
To configure the view, click the gear icon in the row of the view.
General tab
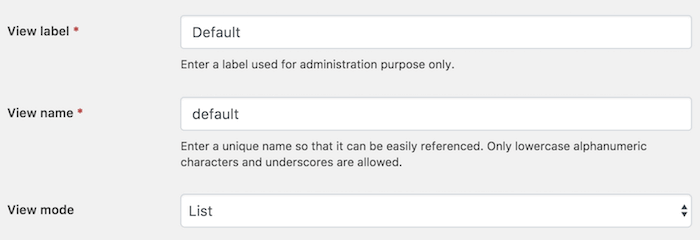
View label - Label of the view used for administration purpose only.
View name - Unique name assigned to the view so that it can easily be referenced. Only lowercase alphanumeric characters and underscores are allowed.
View mode - Mode (or format) used to display content items with the view. By default the following view modes are available for listings; List, Masonry, Map, Photo Slider, and Carousel Slider view modes.
The following are sample outputs of listings for each view mode.
View Mode Settings - Shows settings specific to the view mode selected under General Settings.
Settings specific to List view mode:
Enable grid layout - Whether or not to enable displaying items in grid layout.
Disable row layout - Whether or not to disable displaying items in row layout.
Set grid layout as default - Whether or not to display items in grid layout by default.
Grid layout gutter width - Width and height of gutters between items in grid layout.
Grid layout columns - Select the number of columns shown in Grid layout.
Settings specific to Masonry view mode:
- Number of columns - Select the number of columns shown in masonry layout.
Settings specific to List/Masonry/Map view mode:
Show map - Whether or not to display a small map along with the list of listings.
Map coordinates field - Field that provides lat/lng coordinates to show on map.
Map position - Select where to display the small map, above or next to the list of listings.
Map width - Specify the horizontal display ratio of the map, 12 being 100% wide.
Map height - Height of the map in pixels.
Map marker icon - Select what to show as an icon inside map markers.
Scroll to item on marker click - Whether or not to scroll the screen to the position where the listing is displayed in the list when a marker on the map is clicked.
Enable sticky map - Whether or not to make the map stick to the top of the viewport when scrolling up and down the list.
Enable full screen mode - Whether or not to allow viewing the list and the map in full screen. When enabled, a button will be displayed on the map to toggle full screen mode.
Full screen map width - Specify the horizontal display ratio of the map on the page when in full screen mode, where 12 being 100% wide.
Enable map infobox - Whether or not to display a small popup window (infobox) over the map containing listing information when a marker is clicked on the map.
Map infobox width - Specify the width of the map infobox in pixels.
Open infobox on item hover - Whether or not to show the map infobox when hovering over listings in the list.
Settings specific to Photo slider view mode:
Image field - Select the field used to display a photo image for each content item in the slider.
Image size - Select the size of photo images in the slider.
Number of columns - Select the number of columns to display in each slide.
Show slide indicators - Whether or not to show small dot slide indicators.
Show prev/next arrows - Whether or not to show prev/next navigation arrows.
Show photo captions - Whether or not to show a caption text for each photo.
Autoplay slides - Whether or not to automatically play the slides when the slider is loaded.
Autoplay speed in milliseconds - Specify the slider autoplay speed in milliseconds.
Enable centered view - Whether or not to enable centered view with partial prev/next slides.
Fade in/out slides - Whether or not to use fade in/out effect instead of sliding.
Slider height - Set the height of the slider in pixels.
Photo padding - Set the length of horizontal padding applied to each photo in pixels.
Show thumbnails - Whether or not to show a thumbnail navigation.
Number of thumbnail columns - Select the number of thumbnail columns to display in the thumbnail navigation.
Settings commonly available with every view mode (except for some that may not exist for certain view modes):
Sort Settings tab
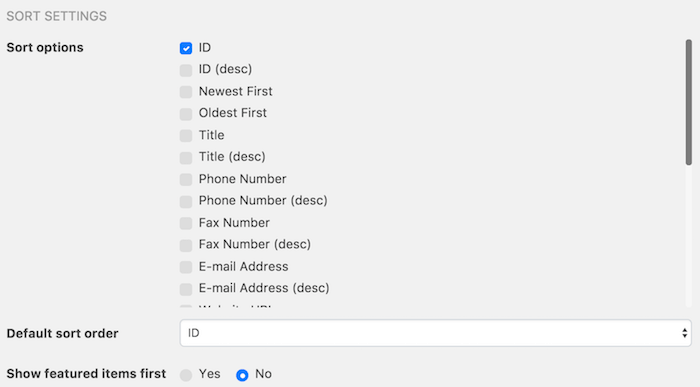
Sort options - Select sorting options that should be available in the Sort by dropdown displayed above content items. You can change the display order of the options by dragging them up and down. You can also unselect all options to disable the Sort By dropdown.
Default sort order - Select the sort option that should be applied by default. Make sure to select one from the ones enabled for Sort options, otherwise the first sort option available will be used as the default.
Secondary sort order - Select the sort option that should be applied in addition to the default or the one selected by the user. This does not need to be one from the ones enabled for Sort options. Unlike the default sort order, this setting can not be changed by the user through the Sort By dropdown.
Show featured items first - Whether or not to display featured items above those non-featured.
Show featured items first on single term pages only - Whether or not to display featured items above those non-featured on single term (category/location/tag) pages only.
Show items with a payment plan first - Whether or not to display content items with a payment plan above those that do not have any payment plan assigned.
Payment plan sort order - Select payment plans that will have the Show items with a payment plan first feature enabled.
Pagination tab

Disable pagination - Whether or not to completely disable pagination.
Pagination type - Select Default to display standard pagination links, select Load more button to incrementally load content items.
Items per page - Set the number of items to show per page.
Allow selection of number of items per page - Whether or not to let viewers select the number of items shown per page.
Allowed number of items per page - Select the number of items per page options available for the viewers to choose from.
Query Settings tab

Query by field - By default, the view will display all public (and private if allowed in permission settings) listings. If you wish to display a certain type of listings only, e.g. featured listings, listings that belong to certain categories, listings with a certain custom field value, you can do so by adding custom query criteria using this setting.
Select a field from the dropdown and then enter a value into the next text box specific to the selected field. Click inside the text box to display a tip on what value you can enter for the field. You can add as many field criteria as you like by pressing the Add More button.
Max number of items to query - Specify the maximum number of items to query from the database. Enter 0 to fetch all that match the query.
Filter Settings tab

Show filter form - Whether or not to display a filter form. For more details on filters, see Adding and Managing Filters.
Select filter group - Select the filter group to be used for the filter form. This setting is available only when you have created extra filter groups from the Manage Filters section.
Show filter form in modal window - Whether or not to display a filter form in a modal popup window instead of displaying the form above content items.
Disable collapsing filter form - Switch on this option to disable collapsing of the filter form and keep it always visible.
Other tab

Show number of items found - Whether or not to show the total number of content items found as well as the number of items currently displayed on the page.
Show "Add Listing" button - Whether or not to show a button which links to the Add Listing page.
Customize "Not found" text - Switch this option on and enter your custom text that is displayed when there are no content items to show.
Click Save Changes to save the view.
Adding a view
You can create additional views for each content type which can then be displayed using a shortcode.
Follow the steps below to add a new view for listings to your directory.
Login to your website if not yet logged in and go to the WordPress administration dashboard.
Click Directories in the admin sidebar.
Under the All Directories tab, click the gear icon in the row of the directory to edit.
Under the Content Types tab, click the dropdown button in the Listing row and then click Manage Views.
Click the Add View green button.
Configure the view. See the Configuring the default view for listings section above for details on each setting.
Scroll down the page and press Save Changes.
You will be redirected back to the manage views page if the view is created successfully. You can then optionally set the view as the default view by clicking on the greyed out check icon under the Default column in the row of the view just created.
![]()
Note: There can only be one default view for each content type in your directory.
Adding a view for other content types
The steps for adding or configuring a view for other content types are exactly the same as above for listings. Simply go to the Manage Views page for each content type from the Content Types tab of your directory admin page and add or configure views from there.
Displaying a view with shortcode
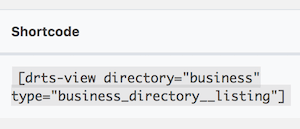
Views can also be displayed using shortcodes. Copy the shortcode text displayed in the Shortcode column for each view and then paste the copied text to the content section of any WordPress post/page or use it in your theme template file with the do_shortcode() function.
You can optionally use the cache parameter to cache the content generated by the shortcode, for example:
[drts-directory-view directory="directory" cache="1"]
This lets the content generated by the shortcode to be cached for a day by default. If you need to increase or decrease the cache duration, you can instead pass a cache lifetime value in seconds using the cache parameter. For example, the code below tells the content to be cached for an hour (3600 seconds):
[drts-directory-view directory="directory" cache="3600"]
As of version 1.2.38, the following parameters can be used to override the settings configured for the view.
Note: These parameters do not work with the default view.
- sort_options - Overrides the "Sort options" setting. Enter the name of sort options separated by a comma.
- sort_default - Overrides the "Default sort order" setting. Enter the name for one of the sort options available.
- sort_secondary - Overrides the "Secondary sort order" setting. Enter the name of one of the sort options.
- sort_stick_featured - Overrides the "Show featured items first" setting. Enter 1 or 0.
- sort_stick_featured_term_only - Overrides the "Show featured items first on single term pages only" setting. Enter 1 or 0.
- sort_payment_plans - Overrides the "Show items with a payment plan first" setting. Enter 1 or 0.
- sort_payment_plans_order - Overrides the "Payment plan sort order" setting. Enter payment plan IDs separated by a comma.
- pagination_no_pagination - Overrides the "Disable pagination" setting. Enter 1 or 0.
- pagination_type - Overrides the "Pagination type" setting. Enter default or load_more.
- pagination_perpage - Overrides the "Items per page" setting. Enter a number.
- pagination_allow_perpage - Overrides the "Allow selection of number of items per page" setting. Enter 1 or 0.
- pagination_perpages - Overrides the "Allowed number of items per page" setting. Enter numbers separated by a comma.
- query_limit - Overrides the "Max number of items to query" setting. Enter a number.
- query_fields - Overrides the "Query by field" setting. Enter a query string in the format of aaa=xxx&bbb=yyy&ccc=zzz... where aaa, bbb, and ccc represent a field name and xxx, yyy, and zzz represent value(s) to query for each field. Example: post_author=1&directory_category=food,internet,travel&field_phone=1234567890
- filter_show - Overrides the "Show filter form" setting. Enter 1 or 0.
- filter_display - Overrides the "Select filter group" setting. Enter the name of a filter group.
- filter_show_modal - Overrides the "Default sort order" setting. Enter 1 or 0.
- filter_shown - Overrides the "Disable collapsing filter form" setting. Enter 1 or 0.
Deleting a view
To delete a view, click the button with a red cross icon in the row of the view that you wish to delete, and then click the Delete View button in the popup window.

Note: You can not delete a view that is currently set as the default view.
Examples
Here are some examples of views and instructions on how to configure them.
Recent Listings
Display 4 most recent listings:

- Go to Directories -> Your Directory -> Content Types -> Listing -> Manage Views.
- Click the Add View button.
- Enter Recent Listings for View label.
- Select List for View mode.
- Switch on Disable row layout.
- Under the Sort Settings tab, check Newest First and uncheck all others for Sort options.
- Select Newest first for Default sort order.
- Under the Query Settings tab, enter 4 for Max number of items to query.
- Click the Add View button at the bottom of the popup window.
- Copy the shortcode generated for the view and use it on any page.
Categories
Note: This view is created by default for your directory.
Display all categories in grid layout grouped by top level categories:

- Go to Directories -> Your Directory -> Content Types -> Category -> Manage Views.
- Click the Add View button.
- Enter Categories for View label.
- Select List for View mode.
- Switch on Disable row layout.
- Select Medium width for Grid layout gutter width.
- Under the Sort Settings tab, check Title and uncheck all others for Sort options.
- Select Title for Default sort order.
- Under the Query Settings tab, select Parent Category - term_parent and enter 0 in the text field for Query by field.
- Under the Pagination tab, switch on Disable pagination.
- Click the Add View button at the bottom of the popup window.
- Copy the shortcode generated for the view and use it on any page.
Popular Locations
Display 12 random locations that have a photo and at least 3 listings:

- Go to Directories -> Your Directory -> Content Types -> Location -> Manage Views.
- Click the Add View button.
- Enter Popular Locations for View label.
- Select Masonry for View mode.
- Under the Sort Settings tab, check Random and uncheck all others for Sort options.
- Select Random for Default sort order.
- Click the Query Settings tab, scroll down to Query by field. Select Photo - location_photo and enter 1 in the text field. Click Add More, select Term content count - entity_term_content_count and enter 3 in the text field.
- Enter 12 for Max number of items to query.
- Under the Pagination tab, switch on Disable pagination.
- Click the Add View button at the bottom of the popup window.
- Copy the shortcode generated for the view and use it on any page.
Featured Listings
Note: This view is created by default for your directory.
Display maximum of 12 random featured listings in a photo slider:

- Go to Directories -> Your Directory -> Content Types -> Listing -> Manage Views.
- Click the Add View button.
- Enter Featured Listings for View label.
- Select Photo slider for View mode.
- Select Photos (Image) for Image field.
- Select Thumbnail for Image size.
- Select 5 for Number of columns.
- Switch on Enable centered view.
- Enter 135 for Slider height.
- Enter 5 for Photo padding.
- Under the Sort Settings tab, check Random and uncheck all others for Sort options.
- Select Random for Default sort order.
- Under the Query Settings tab, for the Query by field setting, select Featured Content - entity_featured and enter 1 in the text field. Click Add More, select Photos - directory_photos and enter 1 in the text field.
- Under the Query Settings tab, enter 12 for Max number of items to query.
- Click the Add View button at the bottom of the popup window.
- Copy the shortcode generated for the view and use it on any page.
Recent Reviews
Display 6 most recent reviews in masonry layout:

- Go to Directories -> Your Directory -> Content Types -> Review -> Manage Views.
- Click the Add View button.
- Enter Recent Reviews for View label.
- Select Masonry for View mode.
- Under the Sort Settings tab, check Newest First and uncheck all others for Sort options.
- Select Newest first for Default sort order.
- Under the Query Settings tab, enter 6 for Max number of items to query.
- Under the Pagination tab, switch on Disable pagination.
- Click the Add View button at the bottom of the popup window.
- Copy the shortcode generated for the view and use it on any page.
Nearby Listings
Display maximum of 10 nearby listings within 20km (or 20mi) from the location of the currently viewed listing sorted by distance:
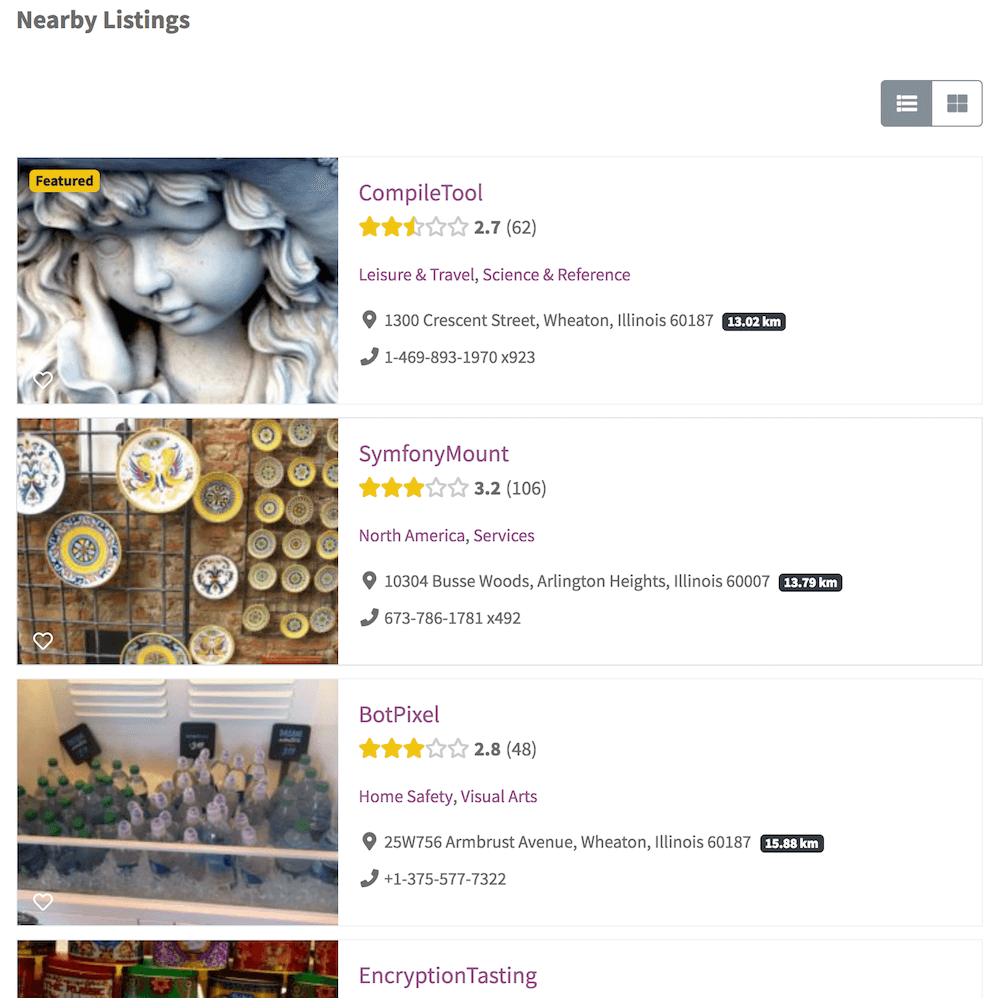
- Go to Directories -> Your Directory -> Content Types -> Listing -> Manage Views.
- Click the Add View button.
- Enter Nearby Listings for View label.
- Select List for View mode.
- Under the Sort Settings tab, check Distance and uncheck all others for Sort options.
- Select Distance for Default sort order.
- Under the Query Settings tab, select Location - location_address and enter _current_,20 in the text field for Query by field.
- Click the Add more button, select ID - post_id and enter -_current_ (do not forget to prefix with "-") in the text field.
- Under the Query Settings tab, enter 10 for Max number of items to query.
- Click the Add View button at the bottom of the popup window.
- Copy the shortcode generated for the view.
- Go to Directories -> Your Directory -> Content Types -> Listing -> Manage Displays.
- Click the Detailed sub-tab.
- Click the green + button at the bottom.
- In the popup window, click the Content tab and then click the Text element.
- Under the General tab, paste the shortcode copied in step 11 into the Text content textarea field.
- Under the Heading tab, select Custom label for Label and enter Nearby Listings into the Custom label setting field.
- Click the Add Element button at the bottom of the popup window.
- Press Save Changes at the bottom of the page.
Related Listings
Display maximum of 3 listings related to the currently viewed listing by tags, sorted randomly:

- Go to Directories -> Your Directory -> Content Types -> Listing -> Manage Views.
- Click the Add View button.
- Enter Related Listings for View label.
- Select List for View mode.
- Switch on Set grid layout as default.
- Under the Sort Settings tab, check Random and uncheck all others for Sort options.
- Select Random for Default sort order.
- Under the Pagination tab, switch on Disable pagination.
- Under the Query Settings tab, select Tags - directory_tag and enter _current_ in the text field for Query by field.
- Click the Add more button, select ID - post_id and enter -_current_ (do not forget to prefix with "-") in the text field.
- Under the Query Settings tab, enter 3 for Max number of items to query.
- Click the Add View button at the bottom of the popup window.
- Copy the shortcode generated for the view.
- Go to Directories -> Your Directory -> Content Types -> Listing -> Manage Displays.
- Click the Detailed sub-tab.
- Click the green + button at the bottom.
- In the popup window, click the Content tab and then click the Text element.
- Under the General tab, paste the shortcode copied in step 12 into the Text content textarea field.
- Under the Heading tab, select Custom label for Label and enter Related Listings into the Custom label setting field.
- Click the Add Element button at the bottom of the popup window.
- Press Save Changes at the bottom of the page.
Listings (with A-Z filter)
Display an A-Z glossary of listings.
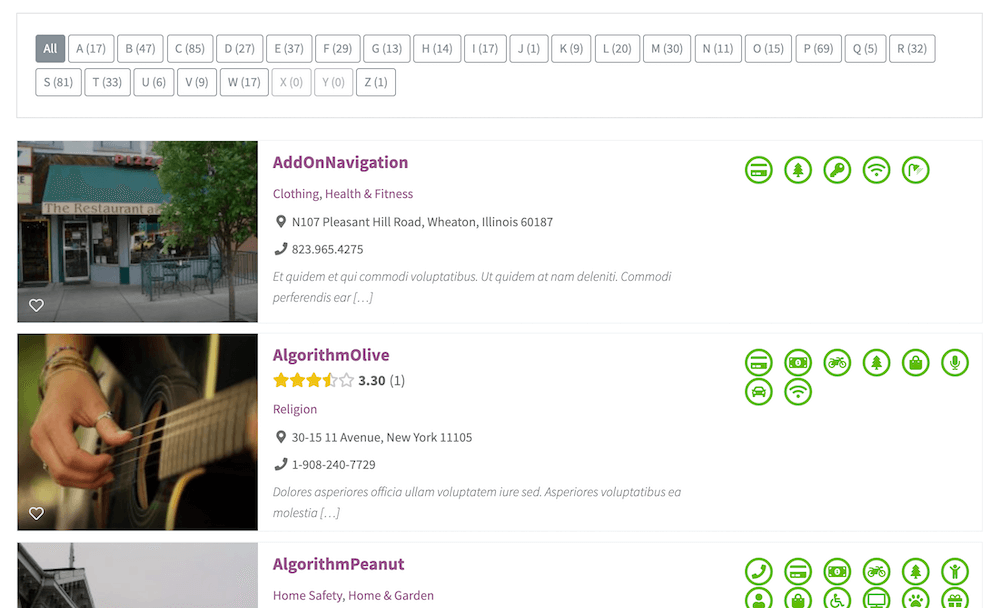
- Go to Directories -> Your Directory -> Content Types -> Listing -> Manage Views -> Manage Filters.
- Click the button with a blue + icon on the left to create a new filter group.
- In the popup window, select Create empty for Create or copy and enter glossary for Name and click Submit.
- Click the green + button to add a new filter.
- In the popup window, click Title under the Fields tab.
- Select A to Z for Filter type and click Add Element.
- Press Save Changes at the bottom of the page.
- Go to Directories -> Your Directory -> Content Types -> Listing -> Manage Views.
- Click the Add View button.
- Enter Glossary for View label.
- Select List for View mode.
- Under the Filter Settings tab, switch on Show filter form and select glossary for Select filter group
- Click the Add View button at the bottom of the popup window.
- Copy the shortcode generated for the view and use it on any page.