Monetization Options and Payment Plans
The Directories - Payments plugin provides the following monetization options for your directory:
- Charge users for submitting new listings
- Charge users for claiming existing listings
- Charge users for renewing or reactivating their listings
- Charge users for upgrading or downgrading their listings
- Charge users for adding extra features to their listings
Payment plans
In order to actually charge users, payment plans need to be setup for your directory. There are 2 types of payment plans that you can setup; Base and Add-on plans.
Base plans
Base plans define base features that should be enabled for listings associated with the plans. A listing may not have multiple base plans associated at the same time. Base plans can be purchased when users submit new listings, claim existing listings, renew their listings, or upgrade/downgrade their listings (correspond to 1-4 monetization options above).
Add-on plans
Add-on plans provide additional features to listings (corresponds to the 5th monetization option above) on top of the features provided with a base plan. A listing must already have a base plan associated in order to have add-on plans applied. There is no limit on how many add-on plans can be purchased for a single listing.
Adding Payment Plans
In WooCommerce, everything is sold as a product. Therefore payment plans for Directories Pro also need to be defined as WooCommerce products. In order to define base and add-on payment plans as WooCommerce products, the following product types are added automatically to WooCommerce:
- Directory - Listing (Base plan)
- Directory - Listing (Add-on plan)
Adding a Base plan
Follow the steps below to define a WooCommerce product for a Base plan:
Login to your website if not yet logged in and go to the WordPress administration dashboard.
Select Products -> Add New from the side menu.
Enter the name of your payment plan into the text field where it says Product name which is a required field. Optionally enter the description of your payment plan into the textarea field under the product name field.
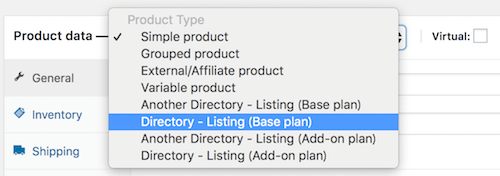
Select the Directory - Listing (Base plan) product type option from the dropdown menu in the Product Data panel.
In the General tab, enter the Regular price field and optionally the Sale Price field if you wish to sell the payment plan at a discounted price.
In the Plan Features tab, configure the features that will be enabled for listings associated with this base plan.
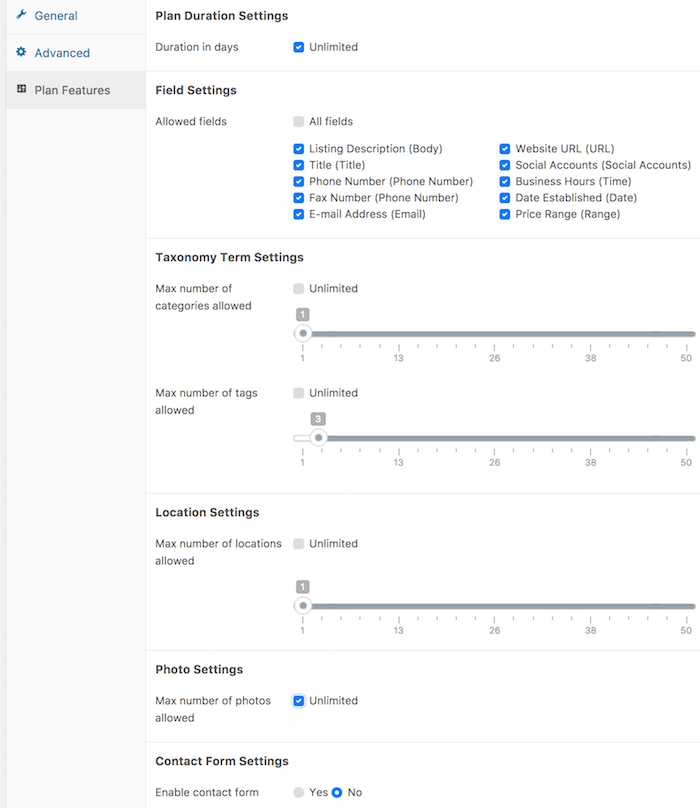
Plan Duration Settings
- Duration in days - Set the length of time in days the payment plan is associated with listings. If you wish to use the prorated discount feature, you should define a limited duration.
Field Settings
- Allowed fields - Select the fields enabled for each listing.
Taxonomy Term Settings
Max number of categories allowed - Select the maximum number of categories each listing can be associated with.
Max number of tags allowed - Select the maximum number of tags each listing can be associated with.
Location Settings
- Max number of locations allowed - Select the maximum number of locations each listing can be associated with.
Photo Settings
- Max number of photos allowed - Select the maximum number of photos that can be uploaded for each listing.
Reviews
- Enable reviews - Whether or not to let users submit reviews for each listing.
Contact Form Settings
Enable contact form - Whether or not to let users send messages to listing authors through a Contact Us form.
Contact form recipients - Select e-mail addresses to which messages are sent. If you have added E-mail type custom fields to listings (See Adding and Managing Fields), those fields can also be selected from here.
Press Publish to add the base payment plan as a WooCommerce product.
Adding an Add-on plan
Follow the steps below to define a WooCommerce product for an Add-on plan:
Follow the steps 1-3 for adding a Base plan described above.
Select the Directory - Listing (Add-on plan) product type from the dropdown menu in the Product Data panel.

In the General tab, enter the Regular price field and optionally the Sale Price field if you wish to sell the payment plan at a discounted price.
In the Plan Features tab, select or enter additional features that should be applied to listings when this add-on plan is purchased.
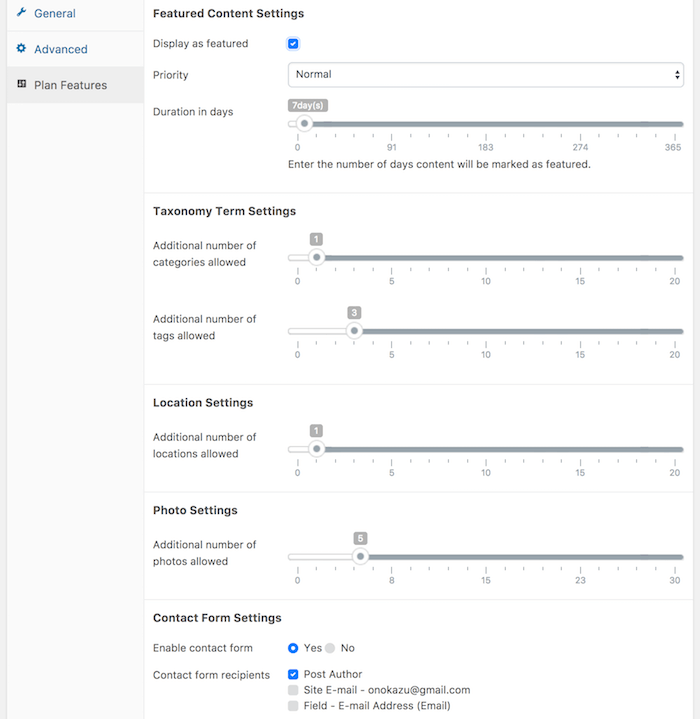
Most of the features available by default are similar to those available for Base plans. Below are some options available for add-on plans only.
Featured Content Settings
Display as featured - Whether or not to mark listings as featured. Featured listings can be displayed above other non-featured listings and/or highlighted to make them stand out or can be displayed separately for example using custom views.
Priority - When multiple featured listings are displayed and sorted by featured listings first, those with higher priority are displayed above those with lower priorities.
Duration in days - Enter the number of days listings will be marked as featured.
Press Publish to add the add-on payment plan as a WooCommerce product.
Configuring default features
Not all listings are assigned a base plan. For example, listings submitted when there were no base payment plans available, or listings submitted by guest users while guest checkout was disabled do not have any base plan associated unless purchased later or manually associated by administrators. These listings are instead applied default features which can be configured by following these steps:
Login to your website if not yet logged in and go to the WordPress administration dashboard.
Click Directories in the admin sidebar.
Under the All Directories tab, click the gear icon in the row of the directory to edit.
Under the Content Types tab, click the Edit button in the Listing row.
Click Payment sub-tab under the Edit tab.
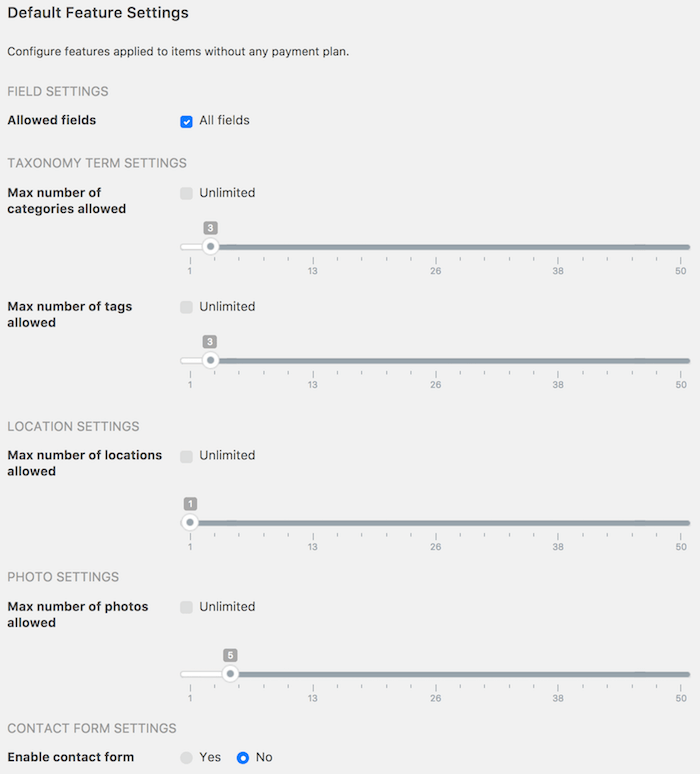
The features configurable in this section are exactly the same as those configurable for base payment plans (See Adding a Base plan above for details on each setting).
Scroll further down the page and press Save Changes.