Managing Locations
Locations let you group listings geographically, such as by countries, states, and/or cities. Locations is a custom taxonomy and are hierarchical in structure just like categories.
Setting up location hierarchy
Before adding locations to your directory, the location hierarchy must first be defined. By default, the location hierarchy is configured as Country -> State / Province / Region -> City. That is, locations at the first level of the hierarchy are treated as countries, locations at the second level as states, provinces, or regions, and locations at the third level as cities.
If you wish to change the default configuration; for example you may want to add a new Town level under City, or remove the Country level because your listings are all located within a single country; you may do so by following these steps.
Login to your website if not yet logged in and go to the WordPress administration dashboard.
Click Directories in the admin sidebar.
Click the gear icon in the row of the directory to edit.
Under the Content Types tab, click the Edit button in the Location row.
Scroll down to the Location Hierarchy Settings section and select Yes for Enable custom location hierarchy.
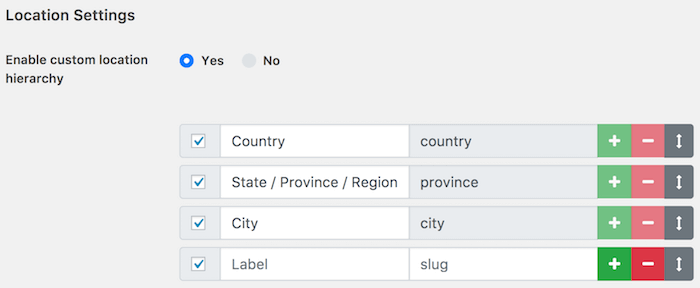
Here you can modify labels, remove one or more levels in the hierarchy, and/or add new levels to the hierarchy.
Note: If you remove all the options, listings can not be associated with locations.
After making changes, scroll down the page and click Save Changes.
Adding a location
Follow the steps below to add a location to your directory.
Login to your website if not yet logged in and go to the WordPress administration dashboard.
Select Locations under your directory menu in the admin sidebar.
Use the Add Location form displayed next to the location list table as shown below:
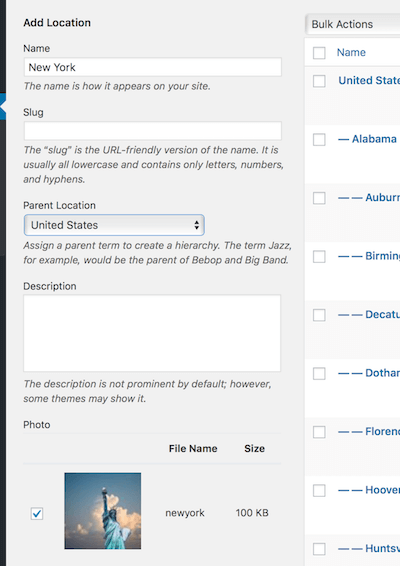
Enter the Name of location and then optionally fill out the Slug and Description fields, select a Parent Location and/or upload a photo for the location from the Photo field.
Click the Add Location button to add your location.
Editing a location
To edit a location:
Login to your website if not yet logged in and go to the WordPress administration dashboard.
Select Locations under your directory menu in the admin sidebar.
In the location list table, hover over to the row of the location that you wish to edit and click the Edit link that appears in the Name column.
Make any changes needed to the location and then click Update.
Deleting a location
To delete a location:
Login to your website if not yet logged in and go to the WordPress administration dashboard.
Select Locations under your directory menu in the admin sidebar.
In the location list table, hover over to the row of the location that you wish to delete and click the Delete link that appears in the Name column.
In the popup window, click OK to delete the location.
Assigning locations to listings
Locations can be assigned to listings just like categories and tags. However, unlike categories and tags, the field for selecting a location is displayed under the Listings Fields metabox along with address and map fields as shown below.
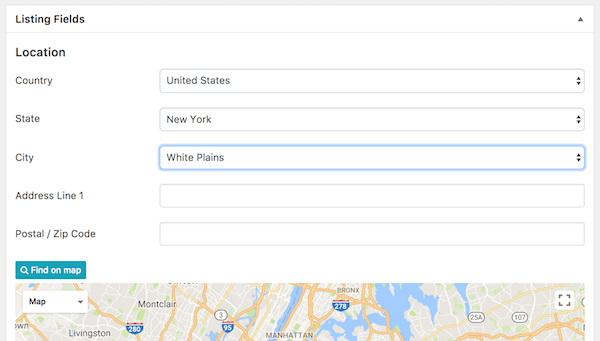
Dropdown fields (Country, State, and City fields in the screenshot above) are displayed for specifying a location for the listing, each field corresponding to a single level in the location hierarchy. Note that you will need to actually select an option from each dropdown field in order to reveal subsequent level dropdown fields.